
Hello Friends, It’s being very long time and I haven’t shared anything. But today I am going to share how to upload file to Google Cloud Storage using PHP. With the help of this code we can upload files from third party hosting as well as from localhost (wamp, lamp, xampp, etc) to Google Cloud Storage. To upload files on Google Cloud Storage we are going to follow below steps :-
Step 1: Create Bucket
Step 2: Make Bucket Public
Step 3: Create Service Account & Download Key
Step 4: Install Composer & Download Google Cloud Storage Library
Step 5: Make Code Ready
Step 6: Upload File
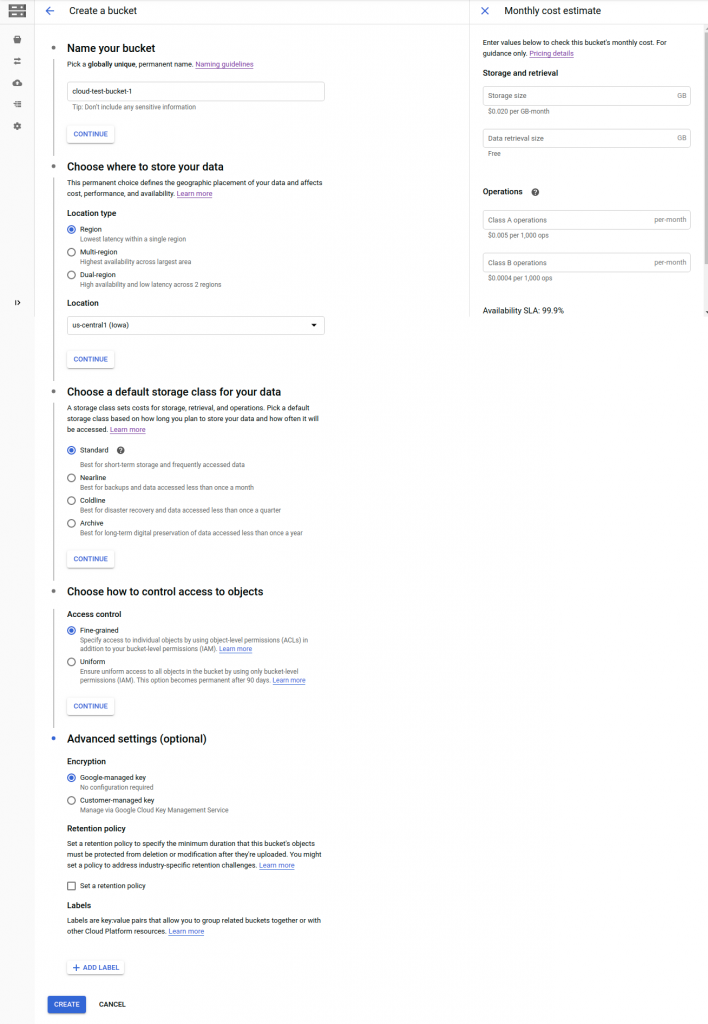
Step 1: Create Bucket
First of all we have to create a bucket in which we will upload/store our files. Buckets are the basic containers that hold your data. Everything that you store in Cloud Storage must be contained in a bucket. To know more about bucket click buckets link in this paragraph. Below screenshot will help us to create bucket from GCP Console or we can execute “gsutil mb gs://[BUCKET_NAME]/” command in Cloud Shell.
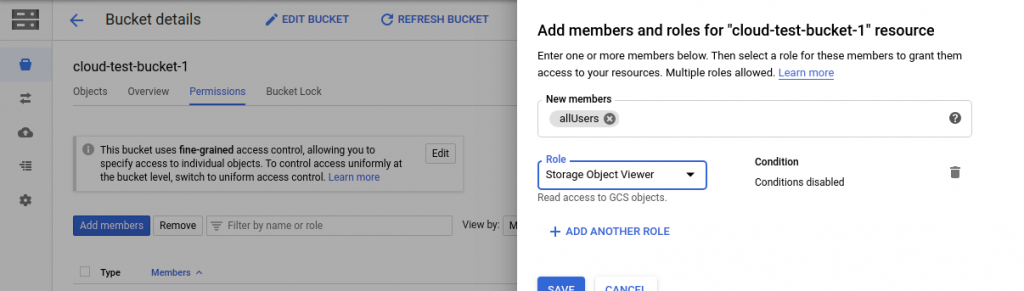
Step 2: Make Bucket Public
After creating bucket our next step is to making it public so that we can access it’s object/files at third party hosting or at localhost using uri like “https://storage.googleapis.com/[BUCKET_NAME]/[OBJECT_NAME]”. Here also below screenshot will help us to make bucket public or we can make it public using “gsutil acl ch -u AllUsers:R gs://[BUCKET_NAME]/” command also.
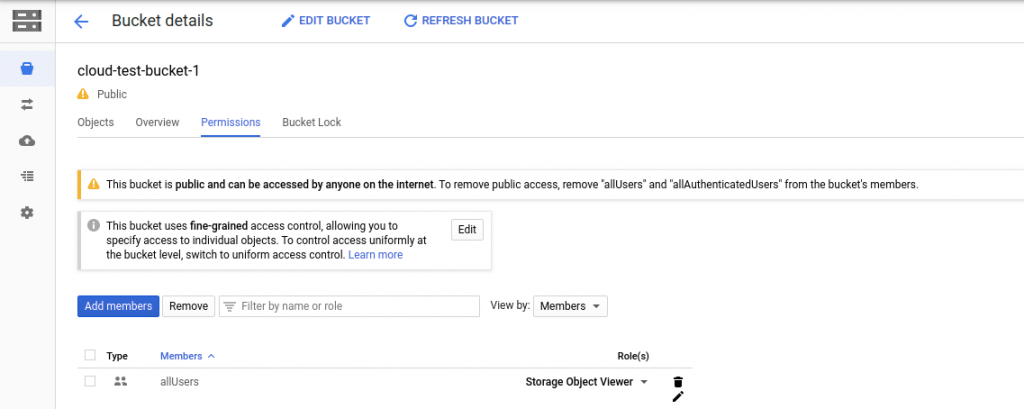
after saving and making it public
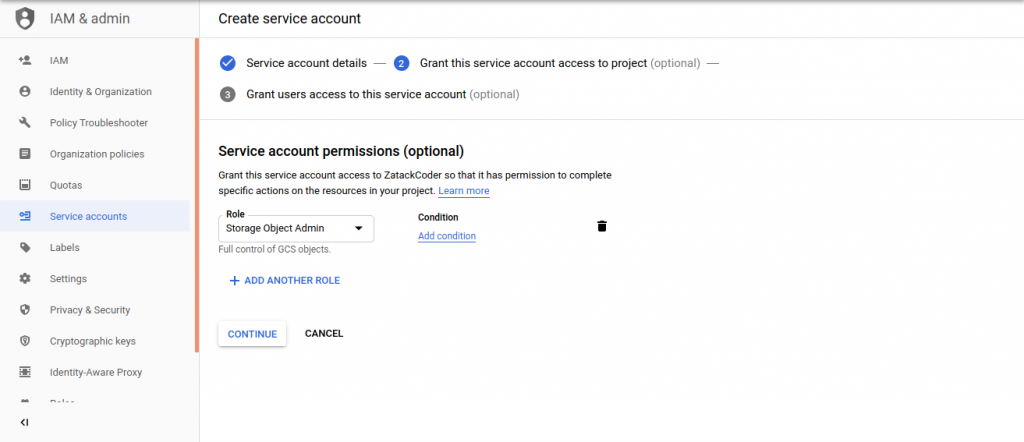
Step 3: Create Service Account & Download Key
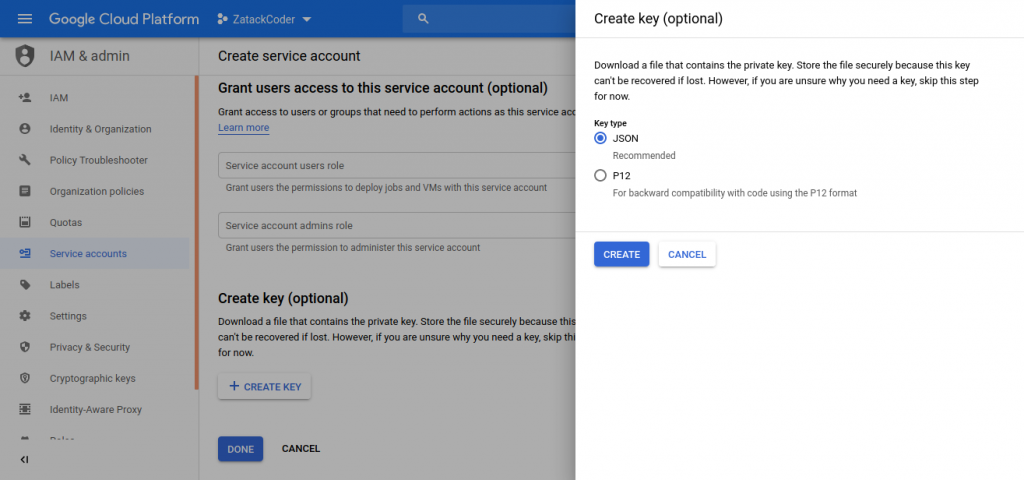
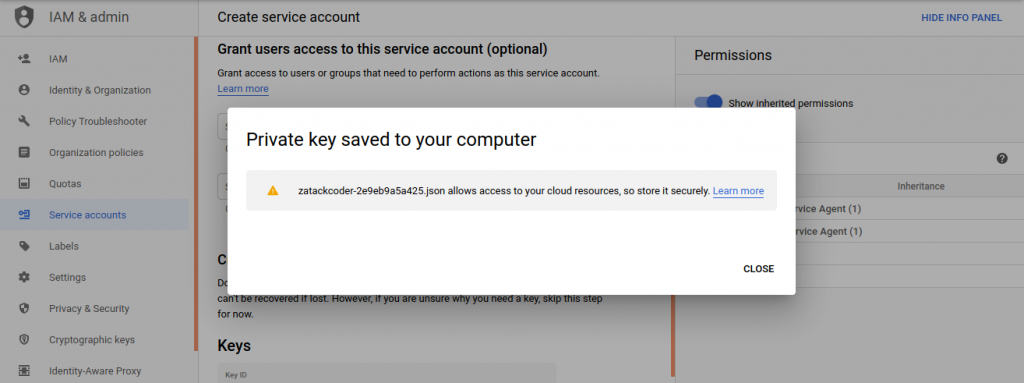
Our next step is to create service account and downloading private key so that we can use that private key to connect to Google Cloud Storage. Below screenshot or command will help us to create service account and download private key.
step 1. creating service account

step 2. granting roles to service account
|
1 2 3 |
gcloud projects add-iam-policy-binding my-project-123 \ --member serviceAccount:my-sa-123@my-project-123.iam.gserviceaccount.com \ --role roles/editor |
OR
step 3. creating key
|
1 2 |
gcloud iam service-accounts keys create ~/key.json \ --iam-account [SA-NAME]@[PROJECT-ID].iam.gserviceaccount.com |
OR
Step 4: Install Composer & Download Google Cloud Storage Library
Now in this step we’ll install Composer (Dependency Manager for PHP). After installing composer download Google Cloud Storage Library which we are going to use in our code and to download it, we’ll use Terminal (Command Line). In command line we’ll create new directory go inside it or we can go to our project folder if already created then we’ll run below command.
|
1 |
composer require google/cloud-storage |
Above command will download only google/cloud-storage library because we want to keep our code small as possible so that we can easily upload our code on third party hosting if needed. Composer will download latest stable version of Google Cloud Storage library after executing above command. After download finishes will have a folder called ‘vendor’ containing library files, we don’t need to change anything inside it.
Step 5: Make Code Ready
Now our next step is to code. We will create three php files here config.php, requests.php, index.php and will upload file through ajax. Here config.php will contain private key and necessary functions, requests.php will use to handle ajax request to upload file and index.php for sending ajax request and receiving response.
config.php
|
1 2 3 4 5 6 7 8 9 10 11 12 13 14 15 16 17 18 19 20 21 22 23 24 25 26 27 28 29 30 31 32 33 34 35 36 37 38 39 40 41 42 43 44 45 46 47 48 49 50 51 52 53 54 55 56 57 58 59 60 61 62 63 64 65 66 67 68 69 70 71 72 73 74 75 76 77 78 79 80 81 82 83 84 85 86 87 88 89 90 91 92 93 94 95 |
<?php // load GCS library require_once 'vendor/autoload.php'; use Google\Cloud\Storage\StorageClient; // Please use your own private key (JSON file content) which was downloaded in step 3 and copy it here // your private key JSON structure should be similar like dummy value below. // WARNING: this is only for QUICK TESTING to verify whether private key is valid (working) or not. // NOTE: to create private key JSON file: https://console.cloud.google.com/apis/credentials $privateKeyFileContent = '{ "type": "service_account", "project_id": "[PROJECT-ID]", "private_key_id": "[KEY-ID]", "private_key": "-----BEGIN PRIVATE KEY-----\n[PRIVATE-KEY]\n-----END PRIVATE KEY-----\n", "client_email": "[SERVICE-ACCOUNT-EMAIL]", "client_id": "[CLIENT-ID]", "auth_uri": "https://accounts.google.com/o/oauth2/auth", "token_uri": "https://accounts.google.com/o/oauth2/token", "auth_provider_x509_cert_url": "https://www.googleapis.com/oauth2/v1/certs", "client_x509_cert_url": "https://www.googleapis.com/robot/v1/metadata/x509/[SERVICE-ACCOUNT-EMAIL]" }'; /* * NOTE: if the server is a shared hosting by third party company then private key should not be stored as a file, * may be better to encrypt the private key value then store the 'encrypted private key' value as string in database, * so every time before use the private key we can get a user-input (from UI) to get password to decrypt it. */ function uploadFile($bucketName, $fileContent, $cloudPath) { $privateKeyFileContent = $GLOBALS['privateKeyFileContent']; // connect to Google Cloud Storage using private key as authentication try { $storage = new StorageClient([ 'keyFile' => json_decode($privateKeyFileContent, true) ]); } catch (Exception $e) { // maybe invalid private key ? print $e; return false; } // set which bucket to work in $bucket = $storage->bucket($bucketName); // upload/replace file $storageObject = $bucket->upload( $fileContent, ['name' => $cloudPath] // if $cloudPath is existed then will be overwrite without confirmation // NOTE: // a. do not put prefix '/', '/' is a separate folder name !! // b. private key MUST have 'storage.objects.delete' permission if want to replace file ! ); // is it succeed ? return $storageObject != null; } function getFileInfo($bucketName, $cloudPath) { $privateKeyFileContent = $GLOBALS['privateKeyFileContent']; // connect to Google Cloud Storage using private key as authentication try { $storage = new StorageClient([ 'keyFile' => json_decode($privateKeyFileContent, true) ]); } catch (Exception $e) { // maybe invalid private key ? print $e; return false; } // set which bucket to work in $bucket = $storage->bucket($bucketName); $object = $bucket->object($cloudPath); return $object->info(); } //this (listFiles) method not used in this example but you may use according to your need function listFiles($bucket, $directory = null) { if ($directory == null) { // list all files $objects = $bucket->objects(); } else { // list all files within a directory (sub-directory) $options = array('prefix' => $directory); $objects = $bucket->objects($options); } foreach ($objects as $object) { print $object->name() . PHP_EOL; // NOTE: if $object->name() ends with '/' then it is a 'folder' } } |
requests.php
|
1 2 3 4 5 6 7 8 9 10 11 12 13 14 15 16 17 18 19 20 21 22 23 24 25 26 27 28 29 |
<?php include_once 'config.php'; $action = filter_var(trim($_REQUEST['action']), FILTER_SANITIZE_STRING); if ($action == 'upload') { $response['code'] = "200"; if ($_FILES['file']['error'] != 4) { //set which bucket to work in $bucketName = "cloud-test-bucket-1"; // get local file for upload testing $fileContent = file_get_contents($_FILES["file"]["tmp_name"]); // NOTE: if 'folder' or 'tree' is not exist then it will be automatically created ! $cloudPath = 'uploads/' . $_FILES["file"]["name"]; $isSucceed = uploadFile($bucketName, $fileContent, $cloudPath); if ($isSucceed == true) { $response['msg'] = 'SUCCESS: to upload ' . $cloudPath . PHP_EOL; // TEST: get object detail (filesize, contentType, updated [date], etc.) $response['data'] = getFileInfo($bucketName, $cloudPath); } else { $response['code'] = "201"; $response['msg'] = 'FAILED: to upload ' . $cloudPath . PHP_EOL; } } header("Content-Type:application/json"); echo json_encode($response); exit(); } |
index.php
|
1 2 3 4 5 6 7 8 9 10 11 12 13 14 15 16 17 18 19 20 21 22 23 24 25 26 27 28 29 30 31 32 33 34 35 36 37 38 39 40 41 42 43 44 45 46 47 48 |
<html> <head> <meta charset="UTF-8"> <title>GCP Storage File Upload using PHP</title> </head> <body> <form id="fileUploadForm" method="post" enctype="multipart/form-data"> <input type="file" name="file"/> <input type="submit" name="upload" value="Upload"/> <span id="uploadingmsg"></span> <hr/> <strong>Response (JSON)</strong> <pre id="json">json response will be shown here</pre> <hr/> <strong>Public Link</strong> <span>(https://storage.googleapis.com/[BUCKET_NAME]/[OBJECT_NAME])</span><br/> <b>Note:</b> we can use this link only if object or the whole bucket has made public, which in our case has already made bucket public<br/> <div id="output"></div> </form> <script src="https://cdnjs.cloudflare.com/ajax/libs/jquery/3.4.1/jquery.min.js" integrity="sha256-CSXorXvZcTkaix6Yvo6HppcZGetbYMGWSFlBw8HfCJo=" crossorigin="anonymous"></script> <script> $("#fileUploadForm").submit(function (e) { e.preventDefault(); var action = "requests.php?action=upload"; $("#uploadingmsg").html("Uploading..."); var data = new FormData(e.target); $.ajax({ type: 'POST', url: action, data: data, /*THIS MUST BE DONE FOR FILE UPLOADING*/ contentType: false, processData: false, }).done(function (response) { $("#uploadingmsg").html(""); $("#json").html(JSON.stringify(response, null, 4)); //https://storage.googleapis.com/[BUCKET_NAME]/[OBJECT_NAME] $("#output").html('<a href="https://storage.googleapis.com/' + response.data.bucket + '/' + response.data.name + '"><i>https://storage.googleapis.com/' + response.data.bucket + '/' + response.data.name + '</i></a>'); if(response.data.contentType === 'image/jpeg' || response.data.contentType === 'image/jpg' || response.data.contentType === 'image/png') { $("#output").append('<br/><img src="https://storage.googleapis.com/' + response.data.bucket + '/' + response.data.name + '"/>'); } }).fail(function (data) { //any message }); }); </script> </body> </html> |
Step 6: Upload File


Note: –
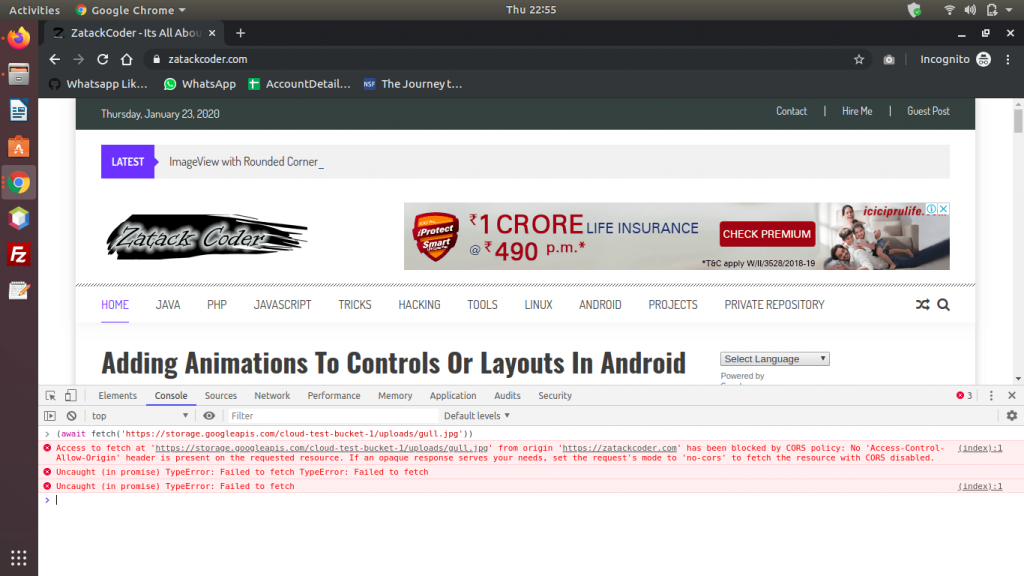
Normally we can upload and download any type of file on Google Cloud Storage but if we want to load file using javascript – XMLHttpRequest (XHR) then by default GCP Storage don’t allow any domain to read file due to CORS policy, so to solve this problem we need create a configuration file to allow one or more domain to access files using XHR and to do that we’ll follow below steps:-
1. Check current configuration using below command
|
1 |
gsutil cors get gs://bucket-name |
2. Create json file like below, containg all our domain name
|
1 2 3 4 5 6 7 8 |
[ { "origin": ["https://zatackcoder.com", "https://zatackcoder.com"], "responseHeader": ["Content-Type"], "method": ["GET"], "maxAgeSeconds": 3600 } ] |
3. Change current configuration using below command
|
1 |
gsutil cors set corssettingfile.txt gs://bucket-name |
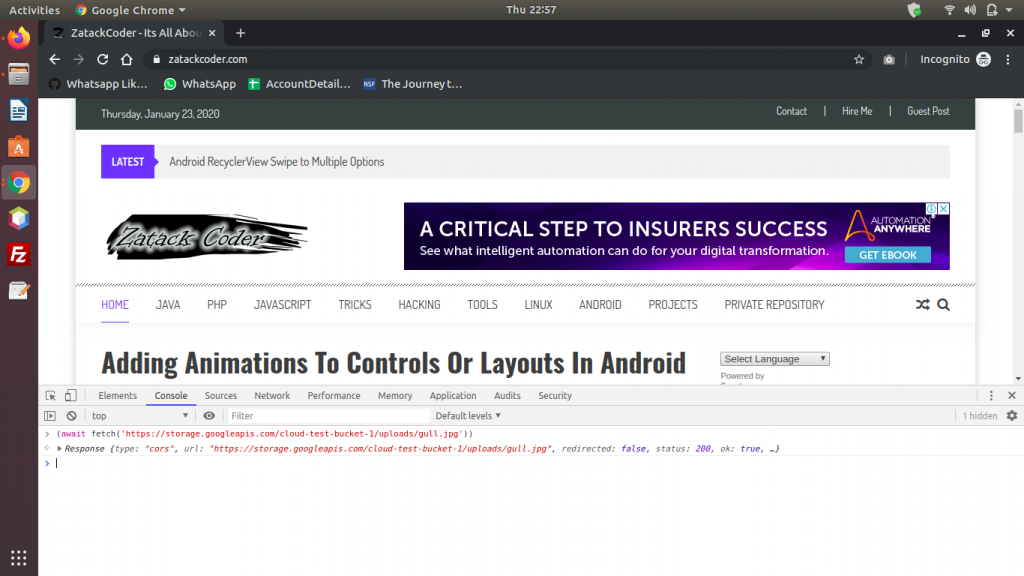
Verifying CORS Settings
To verify CORS settings is working or not we’ll just open our website then we open chrome development console and use below ajax fetch command.
|
1 |
(await fetch('https://storage.googleapis.com/cloud-test-bucket-1/uploads/gull.jpg')) |
NetBeans Project Download
References:-
https://cloud.google.com/storage/
https://cloud.google.com/storage/docs/key-terms#buckets
https://cloud.google.com/storage/docs/creating-buckets
https://cloud.google.com/cloud-console/
https://cloud.google.com/shell/
https://cloud.google.com/storage/docs/access-control/making-data-public
https://cloud.google.com/iam/docs/service-accounts
https://cloud.google.com/iam/docs/creating-managing-service-account-keys
https://getcomposer.org/
https://googleapis.github.io/google-cloud-php/
https://cloud.google.com/iam/docs/creating-managing-service-accounts
https://cloud.google.com/iam/docs/granting-roles-to-service-accounts
https://cloud.google.com/iam/docs/creating-managing-service-account-keys#iam-service-account-keys-create-gcloud
Thank you Friends
Please don’t forget share if you like it

Comments